ABM Update: New sizes now available for the super popular Dynamo hand-held punch cutter.

You asked and we are delivering!

A few months ago we began offering a hand-held punch cutter for 1” buttons.  Right out of the gate we were getting requests for larger sizes.  Well, the wait is over – say hello to the Dynamo Hand-Held Graphic Punch Cutter for 1.25” AND  1.5” buttons! Continue reading

American Button Machines Review: Dynamo Hand-Held Punch Cutter

American Button Machines Review Dynamo Punch Cutter

Dynamo Hand-Held Punch Cutter Specs

Dimensions: 8.5×2.5×3.5
Weight: .95 lbs (less than a pound)
Material Type: Metal
Used For: Punch graphics for 1” buttons. Final graphic cutting size is 1.313”.
Current Price: $74.95

American Button Machines Review

Of the many tools we offer at American Button Machines, the Dynamo Hand-Held Punch Cutter is one of the easiest to use and most lightweight. This special punch cutter combines the best aspects of two already great products, borrowing precision from the heavy-duty tabletop punch cutter and lightweight portability from the adjustable circle cutter. Even better, it’s less expensive than both those tools. Continue reading

ABM Video How-To Series: Aligning and Cutting Button Graphics Using a Punch Cutter

What is as smooth as a butterfly’s flutter?
And as precise as Tiger Woods’ putter?
It slices paper like a hot knife through butter,
Ladies and gents, it’s our peerless punch cutter!

That’s right, we welcome you back to the ABM Video Series, where today we educate you on the simple process for lining up and cutting button graphics using a punch cutter.

Here are the steps, and you can follow along as you watch the video:

Continue reading

ABM Video Series: How to Prepare and Cut Circular Button Graphics

Many times, button making projects involve the creation of bulk sums of buttons. Sure, every now and then you make 5-10 at a time for a small, specific purpose; but, most of the time you are making hundreds or even thousands of buttons and want to make sure that you are being as efficient as possible.

Today’s entry in the ABM Video Series aims to provide useful step-by-step info and a visual tutorial that will help you prepare circular button graphics when you are doing a bulk project.

Continue reading

Button Maker Price Comparison: American All-in-One Kits v Chinese 3-in-1 Button Makers

Welcome back for post #2 in our weeklong series discussing American-made button maker kits and Chinese-made button maker kits. Yesterday we provided an overview and debunked a few myths about Chinese 3-in-1 button machines. Today we are going to do a button maker price comparison, contrasting the costs of Chinese-made button makers to the costs of our American-made button makers.

First, let’s take a look at the hard costs as we dig into this button maker price comparison.

Continue reading

Button University Lesson 8: Making Buttons Is Easy!

Yesterday, in Lesson 7 of Button University, we talked about ways for you to create your templates for your buttons. Today, we are going to show you how easy it is to make a button when using our easy to use, quality button machines.

Watch it happen. Check out the videos of the process. The longest one is only 24 seconds! It really is that easy to make a button!

Here are some more simple step-by-step guidelines on how to make a button using products from American Button Machines.

Button Machine Step-by-Step

Step 1: Place the button components in the Pickup Die and the Crimp Die.
Step 2: Rotate the Pickup Die clockwise until it is underneath the Upper Die.
Step 3: Pull the handle down, easily crimping the shell, graphic, and mylar in the Upper Die.

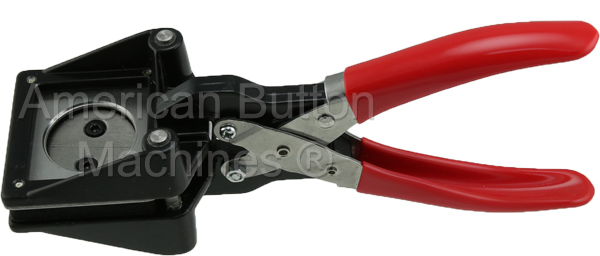
Punch Cutter Step-by-Step

Step 1: Insert the paper strip into the punch cutter and center the graphic in the hole.
Step 2: Push the handle down until the punch goes all the way through the paper.
Step 3: Remove the cut graphic and place to the side.
Step 4: Pull the paper strip through, center the next graphic, and repeat steps 2 and 3.

As you can quickly tell, it doesn’t take long to make a button. And it’s certainly not very difficult! Join us tomorrow as we talk a little more about Fabric Buttons.

Brighid Brown – Director of Blogging and All Things Cool at ABM

Button University Lesson 6: Beginner Button Making Systems and Professional Button Making Systems

Glad you’re back as another week begins to visit The Button Blog and increase your button making success! On Friday, in the fifth installment of our Button University series, we discussed button paper — specifically, how to choose the right kind. Today, we are going to show you the elements of beginner and professional button making systems.

The readership of this blog varies between both beginners and professionals, and with that come natural questions. Although it may seem like a beginner will need a completely different system than a seasoned professional, that’s not completely true. In fact, the only difference between a beginner button making system and a professional button making system is the type of paper cutter you’ll receive. Our Beginner Systems include the Adjustable Rotary Cutter while our Professional Systems include a Punch Cutter.

Once you order the appropriate system you can begin making buttons in minutes… literally.

Below I’ve listed a complete list of what you’ll get in both the Beginner Button Making System and the Professional Button Making System.

Continue reading

Comparing the Circle Cutters – Which One is Right For You?

Choices, choices, choices.

When it comes to choosing a cutter for your button making project, you certainly do have choices.

Today, we are going to help you make the right circle cutter choice by analyzing the three top-of-the-line cutters we offer at America Button Machines: the adjustable rotary cutter; the punch cutter; and, the high volume die-cutting press.

We’ll go one-by-one discussing the features of each cutter, as well as what it is best for. Match this up against the specifics of your project and it will help you to to make the best decision possible.

Continue reading

Circle Cutters Make the (Button) World Go Round

What is the best friend of a button maker?

We suppose that is a difficult question to answer, with many possibilities. Some people might say that their button machine wins the prize, while others might say that there would be no prize without button supplies. But, just for your eyes, is another opinion for you to surmise…

Maybe the circle cutter – yes, the circle cutter – is actually a button maker’s best friend.

Continue reading

Photo Circle Cutter Comparison: Photo Punch and Graphic Punch

Among the many, many questions that we receive on a daily basis are:

  • How awesome is it being immersed in the wonderful world of buttons on a daily basis? (Answer: awesome!)
  • Can you make fabric-covered buttons with your button machines? (Answer: yes!)
  • What is the meaning of life? (Answer: we don’t know, but when we find out we will make custom pinback buttons and send one to all of our past, present, and future customers!)

difference between graphic punch cutter and photo punch cutter
Those, of course, are just three of the myriad questions we get asked. Another of the common queries revolves around two different types of cutters that we offer: the 2.25″ photo punch cutter and the 2.25″ graphic punch cutter

The primary difference between the two cutters is the size of the circle they cut out, and there is a very specific reason why this is the case.  You see, a 2.25″ button machine can’t use true photo paper because it is too thick. Thus, the photo punch cutter actually cuts a circle that is slightly smaller than the standard graphic punch cutter.

Continue reading